Using custom labelling schemes
![]()
What we’ll cover:
Labelling schemes supported by DeepOF.
How to create a new labelling scheme and integrate it with the unsupervised pipeline.
[1]:
%load_ext autoreload
%autoreload 2
[2]:
# # If using Google colab, uncomment and run this cell and the one below to set up the environment
# # Note: because of how colab handles the installation of local packages, this cell will kill your runtime.
# # This is not an error! Just continue with the cells below.
# import os
# !git clone -q https://github.com/mlfpm/deepof.git
# !pip install -q -e deepof --progress-bar off
# os.chdir("deepof")
# !curl --output tutorial_files.zip https://datashare.mpcdf.mpg.de/s/Hu1XjZkY9zml0mm/download
# !unzip tutorial_files.zip
[3]:
# import os
# os.chdir("deepof")
# import os, warnings
# warnings.filterwarnings('ignore')
Let’s start by importing some packages. We’ll use python’s os library to handle paths, pickle to load saved objects, pandas to load data frames, and the data entry API within DeepOF, located in deepof.data
[4]:
import os
import pandas as pd
import pickle
import deepof.data
We’ll also need some plotting gear:
[5]:
from IPython import display
from networkx import Graph, draw
import deepof.visuals
import matplotlib.pyplot as plt
import seaborn as sns
Recap: labelling schemes supported by DeepOF
DeepOF supports three labelling schemes out of the box: the deepof_14 scheme, selected by default, the deepof_11 scheme, which is deepof_14 without tail, and deepof_8, a reduced set of tracking labels that is common among, for example, SimBA users. These schemes expect specific bodyparts to be present and named with specific names. This is necessary, as the supervised analysis and other parts of DeepOF build upon these assumtions. After all, it
is hard to measure a nose-to-nose distance, if no noses where labeled.
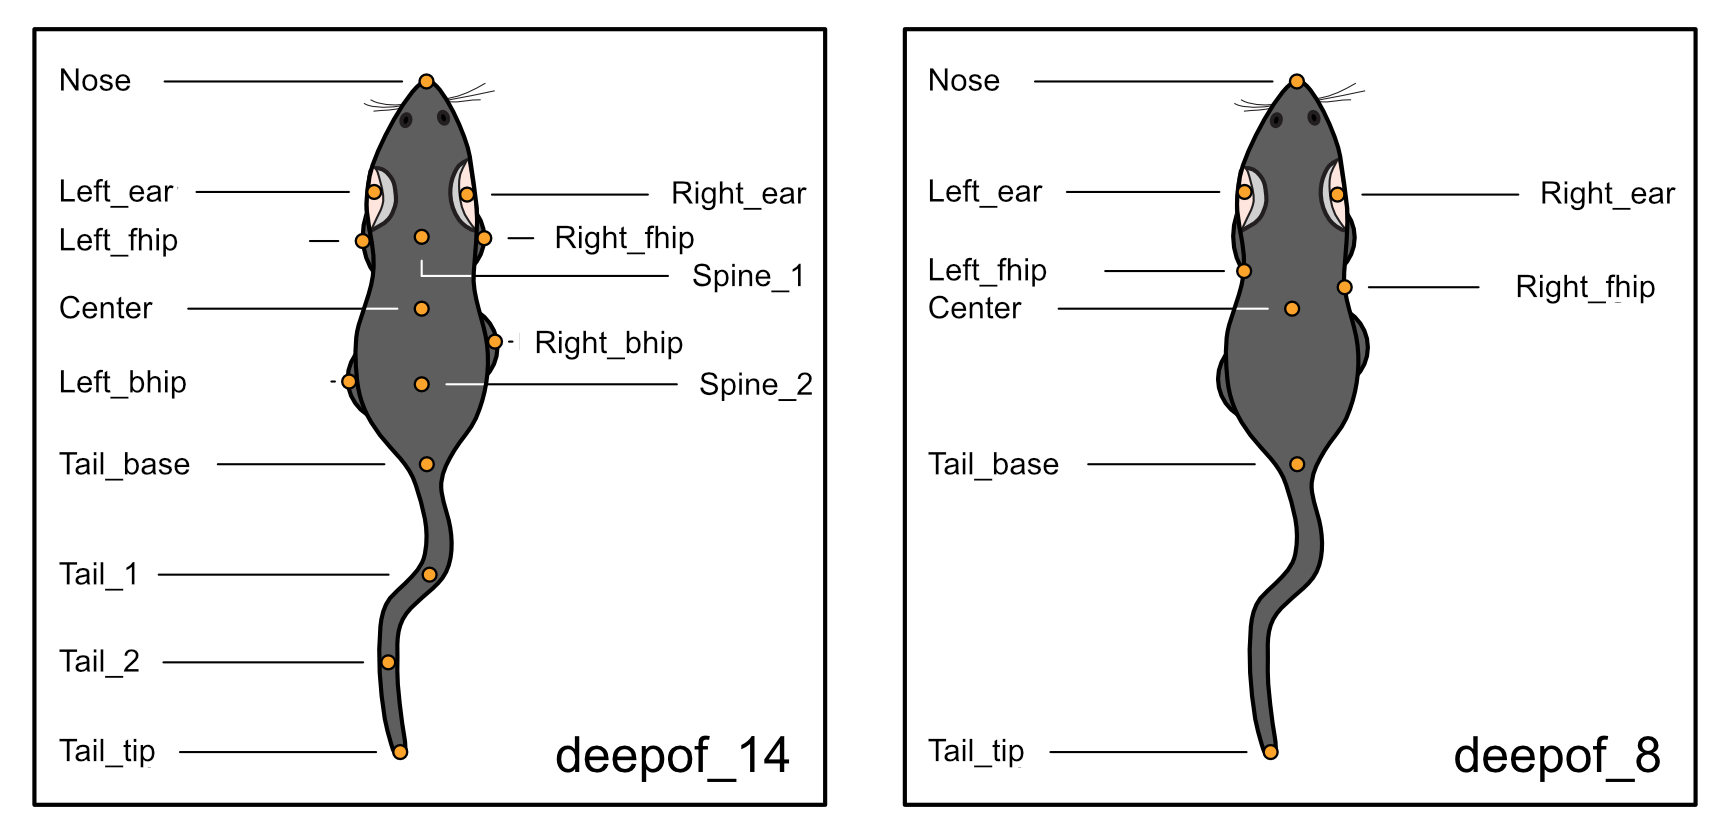
While, as mentioned above, deepof_14 is selected by default, the provided alternative can be selected when defining a new deepof.Project instance:
[6]:
my_deepof_project = deepof.data.Project(
    project_path=os.path.join("tutorial_files"),
    video_path=os.path.join("tutorial_files/Videos/"),
    table_path=os.path.join("tutorial_files/Tables/"),
    project_name="deepof_tutorial_project",
    arena="circular-autodetect",
    animal_ids=["B", "W"],
    video_format=".mp4",
    bodypart_graph="deepof_8",  # Can also be set to 'deepof_14' (default), 'deepof_11' or take a custom graph
    video_scale="380 mm",
    iterative_imputation="partial",
    smooth_alpha=1,
    exp_conditions=None,
)
Info! Set arena dimension to 380.0 mm!
The sampling rate of some of your videos differ. The maximum difference is 20191204_Day2_SI_JB08_Test_54: 24.99 fps and 20191204_Day2_SI_JB08_Test_63: 24.994 fps! Proceed with cauthion
The sampling rate warning here is only a minimal deviation for our 10 minute videos and can be ignored. Sometimes it may have happened that you accidentally named bodyparts differently from what DeepOF expects or that you switched labels. This can be corrected during project definition with the rename_bodyparts input. Here you can simply enter the bodypart names as they are given in your table and then see how DeepOF would reassign them. With the order of the inputs in the list you can determine which label get’s assigned to what. For this example her let’s assume that we accidentally swapped the front hips and used some less conventional names for other bodyparts:
[7]:
my_deepof_project = deepof.data.Project(
    project_path=os.path.join("tutorial_files"),
    video_path=os.path.join("tutorial_files/Videos/"),
    table_path=os.path.join("tutorial_files/Tables/"),
    project_name="deepof_tutorial_project",
    arena="circular-autodetect",
    animal_ids=["B", "W"],
    video_format=".mp4",
    bodypart_graph="deepof_8",  # Can also be set to 'deepof_14' (default), 'deepof_11' or take a custom graph
    video_scale="380 mm",
    iterative_imputation="partial",
    smooth_alpha=1,
    rename_bodyparts=['Nose_tip','main_body_middle','tail_base ','Left_Ear','RigHt_ear ','Right_fhip', 'Left_fhip', 'Tail_end'],
    exp_conditions=None,
)
Info! Set arena dimension to 380.0 mm!
Your custom bodypart names will be assigned to deepOF bodyparts as follows:
Nose : Nose_tip,
Center : main_body_middle,
Tail_base : tail_base ,
Left_ear : Left_Ear,
Right_ear : RigHt_ear ,
Left_fhip : Right_fhip,
Right_fhip : Left_fhip,
Tail_tip : Tail_end,
If this assignment is incorrect, please update your "bodypart_names" list with the correct order and rerun the project creation
The sampling rate of some of your videos differ. The maximum difference is 20191204_Day2_SI_JB08_Test_54: 24.99 fps and 20191204_Day2_SI_JB08_Test_63: 24.994 fps! Proceed with cauthion
The resulting print statement then shows us how bodyparts would get assigned. Since we did not really accidentally mix up anything, let’s not rename anything (and define the video scale in cm for an illustration how to sue different measurment units).
[8]:
my_deepof_project = deepof.data.Project(
    project_path=os.path.join("tutorial_files"),
    video_path=os.path.join("tutorial_files/Videos/"),
    table_path=os.path.join("tutorial_files/Tables/"),
    project_name="deepof_tutorial_project",
    arena="circular-autodetect",
    animal_ids=["B", "W"],
    video_format=".mp4",
    bodypart_graph="deepof_8",  # Can also be set to 'deepof_14' (default), 'deepof_11' or take a custom graph
    video_scale="38 cm",
    iterative_imputation="partial",
    smooth_alpha=1,
    exp_conditions=None,
)
Info! Set arena dimension to 380.0 mm!
The sampling rate of some of your videos differ. The maximum difference is 20191204_Day2_SI_JB08_Test_54: 24.99 fps and 20191204_Day2_SI_JB08_Test_63: 24.994 fps! Proceed with cauthion
[9]:
my_deepof_project = my_deepof_project.create(force=True)
Setting up project directories...
Preprocessing tables          : 100%|██████████| 6/6 [00:02<00:00,  2.24it/s, file=20191204_D..., step=Saving data]
Detecting arenas              : 100%|██████████| 6/6 [01:37<00:00, 16.33s/arena]
Rescaling tables              : 100%|██████████| 6/6 [00:00<00:00, 557.12table/s]
Computing distances           : 100%|██████████| 6/6 [00:00<00:00,  9.69table/s]
Computing angles              : 100%|██████████| 6/6 [00:00<00:00, 33.92table/s]
Computing areas               : 100%|██████████| 6/6 [00:01<00:00,  5.02table/s]
It seems you're using deepof_8 or a custom labelling scheme which is missing key body parts.
You can proceed, but not all areas will be computed.
Done!
We can take a look at the constructed graph in this case (you can see how the default looks like in the previous tutorial, or change the labelling scheme to deepof_14 in the cell above if you’re following in colab):
[10]:
graph_preprocessed_coords, shapes, adj_matrix, to_preprocess, global_scaler = my_deepof_project.get_graph_dataset(
    animal_id="B", # Comment out for multi-animal embeddings
    center="Center",
    align="Center",
    window_size=25,
    window_step=1,
    test_videos=1,
    preprocess=True,
    scale="standard",
)
Loading tables                : 100%|██████████| 5/5 [00:02<00:00,  1.84step/s, step=Get graph info]
Sampling                      : 100%|██████████| 6/6 [00:00<00:00, 35.07table/s]
Scaling                       : 100%|██████████| 6/6 [00:00<00:00, 12.85table/s]
Get training windows          : 100%|██████████| 5/5 [00:00<00:00, 995.52table/s]
Get testing windows           : 100%|██████████| 1/1 [00:00<00:00, 1000.31table/s]
Reshaping                     : 100%|██████████| 2/2 [00:00<00:00, 20.03table/s]
[11]:
plt.figure(figsize=(3, 3))
draw(Graph(adj_matrix))
plt.show()
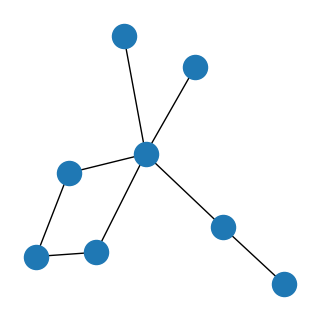
We indeed see a graph with 8 labels! The diamond shape corresponds to nose, ears and center. The outer branches to both sides and the tail.
This will adapt the whole downstream pipeline to work with the 8-label scheme. A more flexible alternative, if neither scheme fits your data, is to create a custom graph. Next, let’s see how this can be achieved!
Creating a new labelling scheme
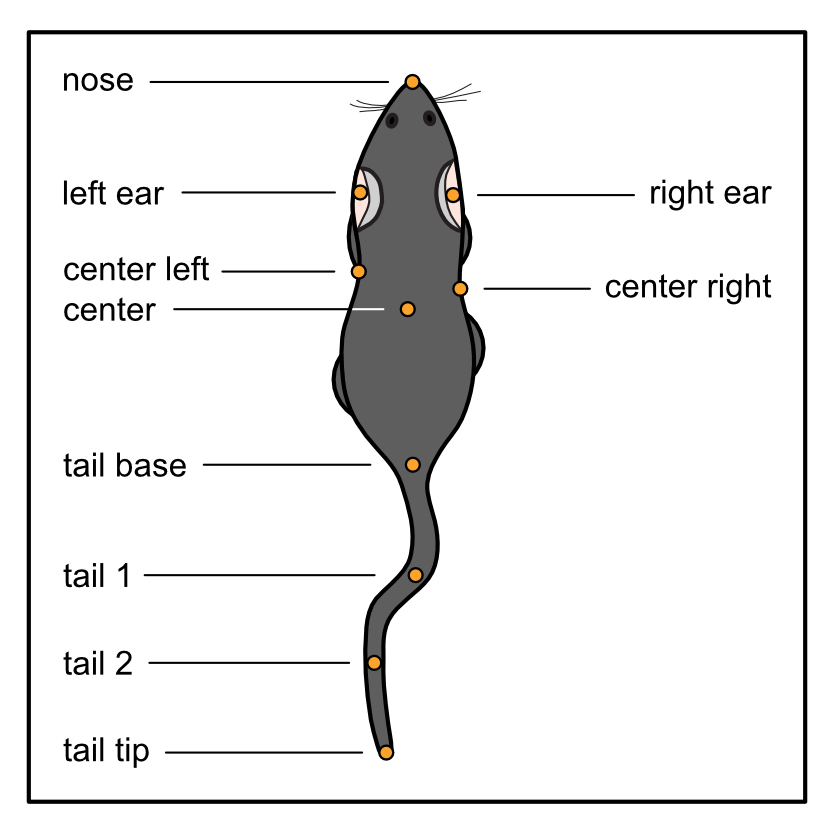
Now, on for a slightly more involved task. What happens if we want another labelling scheme, not supported by DeepOF? We need to build the graph by hand using an adjacency list, and pass it to the deepof.Project constructor. Let’s see! We’ll adapt the deepof_8 labelling scheme to include the full tail, which should look like this:
To start, we should create a Python dictionary specifying all connections we want. To be clear, keys in the dictionary will be connected to every element in the lists passed as values. There is no unique way of implementing this, so feel free to be creative! But an example that works is the following:
[12]:
deepof_custom = {
    "Nose": ["Left_ear", "Right_ear"],
    "Center": ["Left_ear", "Right_ear", "Left_fhip", "Right_fhip", "Tail_base"],
    "Tail_base": ["Tail_1"],
    "Tail_1": ["Tail_2"],
    "Tail_2": ["Tail_tip"],
}
Here, Nose is connected to Left_ear and Right_ear, and so on. Next, we’ll pass this structure to the bodypart_graph parameter in the deepof.Project constructor.
[13]:
my_deepof_project = deepof.data.Project(
    project_path=os.path.join("tutorial_files"),
    video_path=os.path.join("tutorial_files/Videos/"),
    table_path=os.path.join("tutorial_files/Tables/"),
    project_name="deepof_tutorial_project",
    arena="circular-autodetect",
    animal_ids=["B", "W"],
    video_format=".mp4",
    bodypart_graph=deepof_custom,  # Can also be set to 'deepof_14' (default), 'deepof_11' or 'deepof_8'
    video_scale="380 mm",
    iterative_imputation="partial",
    smooth_alpha=1,
    exp_conditions=None,
)
Info! Set arena dimension to 380.0 mm!
The sampling rate of some of your videos differ. The maximum difference is 20191204_Day2_SI_JB08_Test_54: 24.99 fps and 20191204_Day2_SI_JB08_Test_63: 24.994 fps! Proceed with cauthion
[14]:
my_deepof_project = my_deepof_project.create(force=True)
Setting up project directories...
Preprocessing tables          : 100%|██████████| 6/6 [00:02<00:00,  2.13it/s, file=20191204_D..., step=Saving data]
Detecting arenas              : 100%|██████████| 6/6 [01:16<00:00, 12.67s/arena]
Rescaling tables              : 100%|██████████| 6/6 [00:00<00:00, 554.39table/s]
Computing distances           : 100%|██████████| 6/6 [00:00<00:00,  9.31table/s]
Computing angles              : 100%|██████████| 6/6 [00:00<00:00, 54.47table/s]
Computing areas               : 100%|██████████| 6/6 [00:00<00:00, 42.32table/s]
It seems you're using deepof_8 or a custom labelling scheme which is missing key body parts.
You can proceed, but not all areas will be computed.
Done!
Getting a custom graph dataset for the unsupervised pipeline
Now everything works the same way as before! Let’s then obtain a new graph dataset using this custom labelling scheme, and make sure the obtained graph matches our expectations:
[15]:
graph_preprocessed_coords, shapes, adj_matrix, to_preprocess, global_scaler = my_deepof_project.get_graph_dataset(
    animal_id="B", # Comment out for multi-animal embeddings
    center="Center",
    align="Tail_base",
    window_size=25,
    window_step=1,
    test_videos=1,
    preprocess=True,
    scale="standard",
)
Loading tables                : 100%|██████████| 5/5 [00:00<00:00,  5.44step/s, step=Get graph info]
Sampling                      : 100%|██████████| 6/6 [00:00<00:00, 31.68table/s]
Scaling                       : 100%|██████████| 6/6 [00:00<00:00, 11.37table/s]
Get training windows          : 100%|██████████| 5/5 [00:00<00:00, 720.67table/s]
Get testing windows           : 100%|██████████| 1/1 [00:00<00:00, 990.62table/s]
Reshaping                     : 100%|██████████| 2/2 [00:00<00:00, 12.39table/s]
[23]:
plt.figure(figsize=(3, 3))
draw(Graph(adj_matrix))
plt.show()
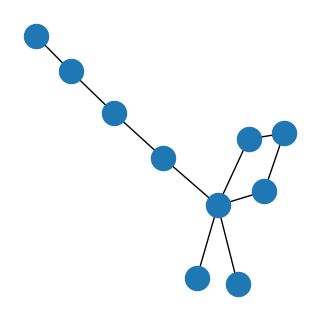
NOTE: the supervised annotations and other parts of DeepOF require the presence or absence of specific bodyparts, so keep in mind that many supervised behaviors cannot be computed, if the respective bodyparts are not included in your custom labelling scheme
And that’s it! Now you should be able to adapt the unsupervised pipeline within DeepOF to any labelling scheme of choice. Note that this should still work with bottom-up or side view videos.
Wrapping up
Thank you for making it until the end. This was a slightly more involved tutorial for those users that do not rely on top-down labels like those provided out of the box. Stay tuned for more content, and make sure to raise an issue in our GitHub repository if you have any questions!